
How to Make Your Own Roller Skates
A few weeks ago, I posted about my homemade skates on Instagram, and since then I’ve had a ton of people asking me how I made them. So, I’ve decided to do a blog about how I made my skates!
To start, I just want to say that making these skates was such a fun and rewarding process. Skating has become a huge part of my life in the last year. It’s helped me lose weight, make new friends, and reconnect with myself in a way that I didn’t think was possible anymore. So, to honor everything that skating has given me, I thought it would be a cool idea to make my own skates.
Note that making these skates did take some effort, but the end result was so worth it. And hopefully, this blog inspires you to get out, make your own skates, and join the wonderful, magical world of rollerskating.
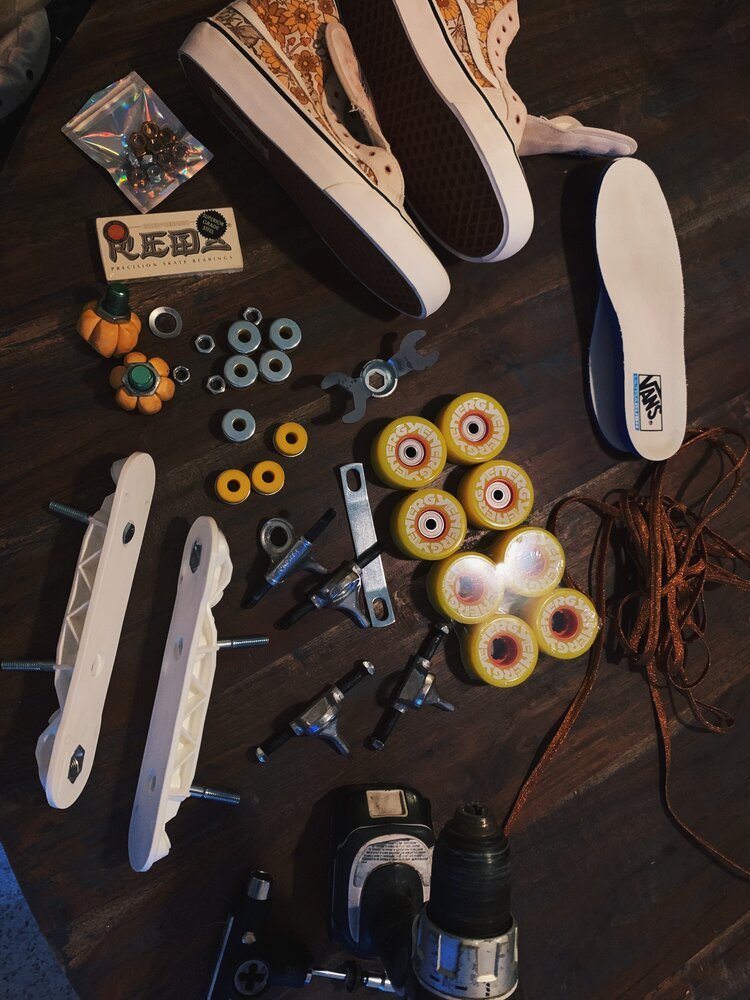
Everything you need to make your own roller skates
What you need
Wheels
You can use any type of wheel you want, but I chose Radar Energy wheels because they’re great hybrid wheels that allow you to skate inside and outside. Plus, they’re super cute and come in a variety of colors.
Shoes
Any flat-bottomed shoe will work, but I chose Vans. You want the bottom of the shoe to be as flat as possible so it adheres better to the plate, and you may also want to consider a high-top shoe for better ankle support.
Plate
As far as plates go, I ordered a set of Sunlite plates from rollerskatenation.com. The plate comes with everything you need like the cushions, cushion cups, trucks, and axel nuts, but for the additional mounting hardware ( screws, nuts, and bolts, to mount your plate on the shoe) you have to add on the mounting kit. To do this check the box depicted in the picture below when you’re ordering your skates. It’s only an additional $6 charge.
Toe stops or jam plugs
You can choose whichever one or whatever kinds you want to screw into your plate, but I chose some Jammerz jam plugs from pigeonskates.com. I didn’t get these for any particular reason other than they’re super cute, and they light up.
Bearings for your wheels
I chose some Bone ceramic bearings from Amazon.com because they last longer than the metal ones. In Miami, you’re bound to get your skates wet, so if you have metal bearings, you’re going to be dealing with rust and have to get them replaced sooner. However, metal bearings still work fine, and they’re way cheaper.
Power drill
Bolt cutters
Sander
Wrench
Sharpie
Ruler
What to do:
1. After you’ve ordered all your parts and have everything you need, you can start the process of building your very own skates. The first step is to take off the laces and everything else off your shoes to have the most accessibility to the bottom of the shoe. Then, remove t the shoes’ cloth insoles and set them aside. Next, you’re going to put the metal insoles in the shoes.
2. Now, flip the shoe around to the bottom sole and figure out where the center of the shoe is. I did this by measuring with a ruler. Mark the center vertical line with a Sharpie. And then, mark the intersection of the vertical middle line with the fattest part of the shoe.
This will roughly be around where you want the front part of your plate to be. However, it could be a little different for each person depending on the shape of your foot. The best guideline to follow for plate placement is to have the front trucks be directly under the ball of your foot. Remember you want the toe stopper to be right at your toe base so adjust accordingly.
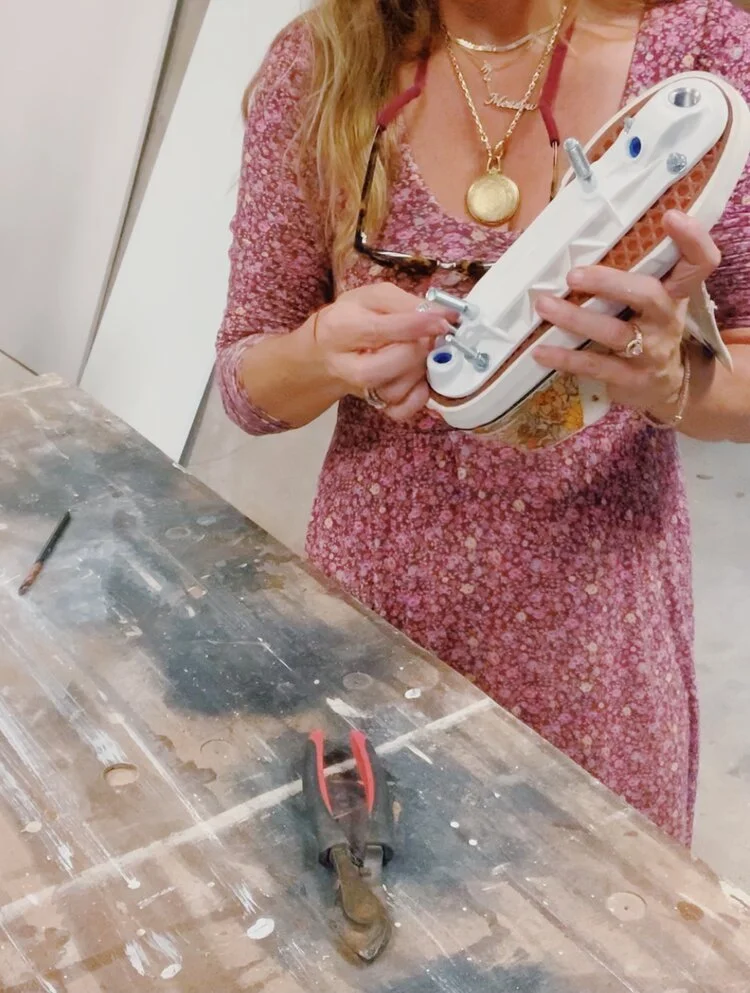
3. Next, line up the front edge of your plate with the marked intersection. Now, with a Sharpie, mark the four holes of the plate.
Note that you will want to take your entire plate a part for the next step. Take off the trucks, cushions, cushion cups, and axel nuts and set these items aside.
4. Take the plate off and stuff the shoe with fabric or old socks. This is a vital step because when you’re drilling a hole through the bottom of your shoe, you don’t want to go too far and puncture the canvas or fabric of the shoe.
5. Now you’re ready to drill your holes. With the metal insole is inside, you’re going to use a power drill to drill holes in the spots that you marked with the Sharpie. You’re going to drill through the sole and metal insoles of the shoe.
6. Remove the stuffing from the shoes. And then take the plate and match the holes you drilled with the holes on the plate.
7. Now, put the screw (from the mounting kit that came with your plate) through the metal insole to the bottom of the shoe and through the plate. The two shorter screws will be in the front and the two longer screws will be in the back.
This step may take a little bit of time because some wiggling and adjusting are needed to get the screw all the way through to the plate.
A set of metal insoles
I ordered mine from a girl on Etsy. They’re about $25, and she makes all of her templates for Vans, but you may be able to ask for custom insoles. The other option you have is to make the metal insoles yourself, but that is much more labor-intensive and requires access to tools that can cut sheet metal. It’s very important that you have metal insoles because tennis shoes are flimsy, flexible, and don’t provide enough stability by themselves. And trust me you definitely want stability. Take it from someone who has fallen a lot.
Loved making these roller skates out of vans
8. Next, put a washer and a nut on each screw (the washers and nuts come from the same mounting kit that came with your plate). Fasten with the wrench.
Note that the screws are going to be long. So, this is where you want to take your bolt cutter and cut the screws to a shorter length. After cutting the screws, file them down with the sander so they aren’t sharp.
9. After the plate is secured to the shoe, we’re going to start putting our skates together. Take out all of the items from the plate that you set aside earlier. Locate the kingpin. (The kingpins are the two long screw-like objects protruding from the base of the plate. Everything will be stacked on the kingpin in the following steps.)
10. First, stack your cushion cups (small thin circular metal ring) at the base of each kingpin. Then stack one of the cushions (the colored gummy ring) on the cushion cup. Follow with the trucks, another cushion, and the final cushion cup.
Now you have everything stacked appropriately on the kingpin.
11. After everything is stacked on the kingpin, secure with the axel nut (the axel nut was already secured onto the plate before you took the plate apart.) Fasten with the wrench.
12. And once you have everything fastened, attach the wheels.
Each wheel takes two bearings, so pop the bearings into the wheels with your handings or use a bearing tool.

If you can’t buy roller skates, you can always make them
13. Now, put the wheel onto the axle, and then tighten the side axel nut.
When you’re attaching the wheel to the skate, don’t fasten too tightly or too loosely. Ideally, you want the wheel to spin really smoothly, but you don’t want it to wiggle.
14. Finally, you’re going to screw on your toe stops or jam plugs, put the cloth insoles back into the bottom of the shoes, and put the laces back on the shoes.
That’s it! Now you have a brand new pair of groovy skates. Send me pictures once you’ve made them.
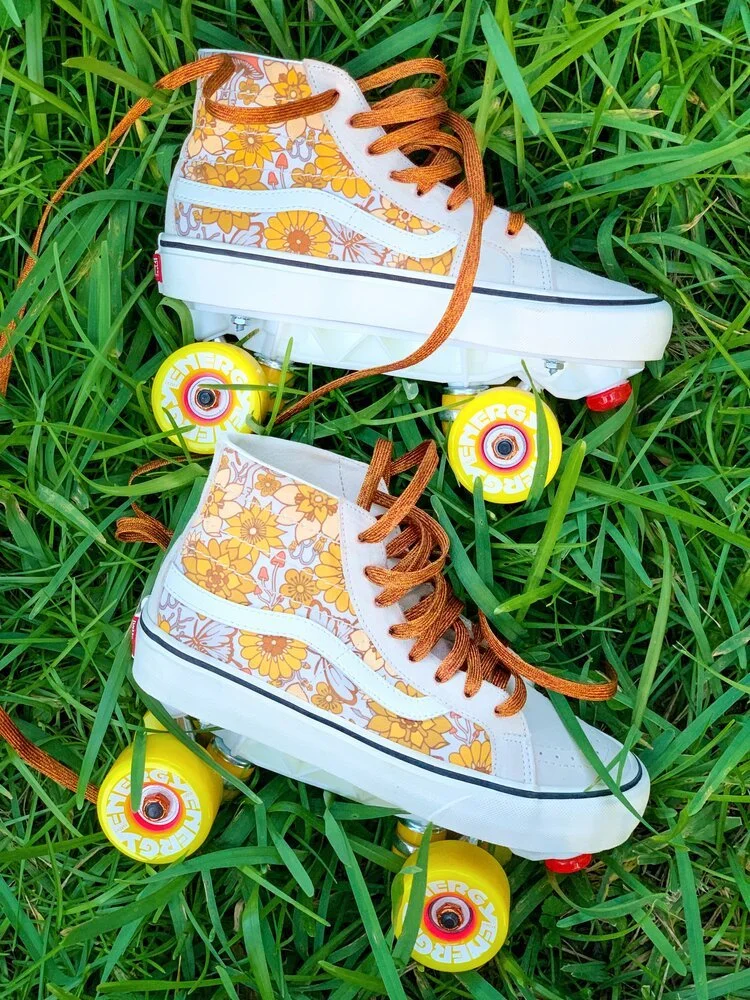
DIY roller skates